 Tweet
Tweet
By Freakler
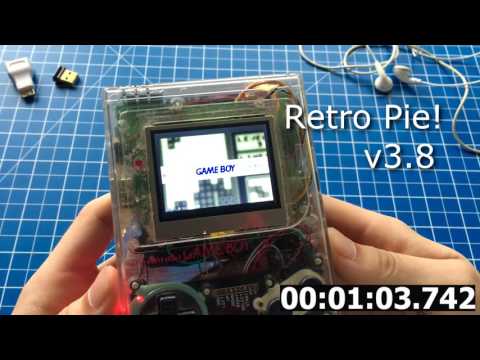
As promised, here is the second version of my GameBoy Pi project!!
Like with the first version

my personal goal was to keep everything as original as possible and I think that worked pretty well. I kept all important parts and even the screw holes are all still intact. Thanks to the new tiny Raspberry Pi Zero there is actually a lot of room and if I hadn't dremeled a lot of the case to fit the old Pi B model already, even the battery compartment and cover could be intact. Nevertheless I'm quite happy with the result..
Thanks going out to kitch-bent and adafruit for the parts, pimoroni for getting me the actual Pi Zero and wermy for re-motivating me finally doing this.
Small update: https://twitter.com/freakler94/statu...99630477574145
Q: Which screen did you use?
A: Its some Chinese no-name car monitor running on 5 volts by default so that's nice. However and as you can see in the video it sometimes refuses to turn on so there is still a little tweaking to do.
Q: Teensy or GPIO for the button input?
A: GPIO and RetroGame! Very awesome software! A teensy is unnecessary imo and takes a lot of space too.
Q: How did you get audio output?
A: I installed a small 2-port USB hub and added a USB sound card which works great. The other USB port can be used externally for WiFi or a keyboard.
Q: Why the hell did you use a transparent case?!?
A: Well i got the GameBoy pretty cheap and nobody made a transparent one yet so why not.
Q: Do you have a build log or something?
A: Not really, but there are some pics on my twitter account @freakler94 under #GameBoyPi . If there should be interest I might write something up with pictures and everything though.
Q: What did this cost you?
A: Actually it was quite expensive to get all the parts to me and in the end that added up to over ~120 bucks actually
If there are any more questions feel free to ask.
As promised, here is the second version of my GameBoy Pi project!!
Like with the first version
my personal goal was to keep everything as original as possible and I think that worked pretty well. I kept all important parts and even the screw holes are all still intact. Thanks to the new tiny Raspberry Pi Zero there is actually a lot of room and if I hadn't dremeled a lot of the case to fit the old Pi B model already, even the battery compartment and cover could be intact. Nevertheless I'm quite happy with the result..
Thanks going out to kitch-bent and adafruit for the parts, pimoroni for getting me the actual Pi Zero and wermy for re-motivating me finally doing this.
Small update: https://twitter.com/freakler94/statu...99630477574145
Q: Which screen did you use?
A: Its some Chinese no-name car monitor running on 5 volts by default so that's nice. However and as you can see in the video it sometimes refuses to turn on so there is still a little tweaking to do.
Q: Teensy or GPIO for the button input?
A: GPIO and RetroGame! Very awesome software! A teensy is unnecessary imo and takes a lot of space too.
Q: How did you get audio output?
A: I installed a small 2-port USB hub and added a USB sound card which works great. The other USB port can be used externally for WiFi or a keyboard.
Q: Why the hell did you use a transparent case?!?
A: Well i got the GameBoy pretty cheap and nobody made a transparent one yet so why not.
Q: Do you have a build log or something?
A: Not really, but there are some pics on my twitter account @freakler94 under #GameBoyPi . If there should be interest I might write something up with pictures and everything though.
Q: What did this cost you?
A: Actually it was quite expensive to get all the parts to me and in the end that added up to over ~120 bucks actually
If there are any more questions feel free to ask.

Comment